
Like every other home brewer out there, I outgrew my taps. My 2-tap kegerator that I built about three years ago has served me very well, but I started to feel like a lot of my batches in the pipeline was getting backed up in the primary/secondary for way too long with nowhere to go. Cask-conditioning beers on the side alleviated some of the backlog, and aging some on oak and/or bacteria is good too, but the best way to enjoy more variety was either to start bottling or build more taps. More taps was the answer. So I embarked on the journey to build a 4-tap kegerator from a chest freezer. Spoiler alert, here’s the finished product:

I started out just looking around online at other people’s designs for inspiration. The common keezer design with a raised wooden collar is probably the most popular option for a more-than-two tap system, since chest freezers come in all different sizes and can fit lots of kegs. I’ve never been a fan of the way that they look, though. While very functional, they all seem to look way too box-y in the end, even when they’re nicely finished with either paint or wood paneling. Then I stumbled upon this design by Drew McDowell, and really dug his design. The weathered wood combined with pipe tap towers gives it an awesome mashup of rustic and industrial, and would look great on my porch that has a lot of exposed unfinished wood. His design has 3 taps and uses 2 towers, but I decided to do 4 taps each with their own tower. Let’s do it!
I wound up using my lagering chest freezer which is a 7.2 cubic ft Igloo brand (with an external temp regulator, of course). I started out just building a wooden frame around it out of 2×4’s and some plywood for the base, allowing about an inch of clearance on each side of the freezer between the frame. I added casters to make it easier to move around, since this thing is freakin’ heavy. The freezer extends about 1/2 inch taller than the frame while sitting inside, because we’ll be bolting the entire top to it later.

For the side panels, i found some reclaimed wood at a lumber yard near my house which worked perfectly. The boards were standard fir panels in their previous life, having a notch and tongue on opposite sides so that they could be easily interlocked. This was handy for stacking them up alongside the fridge for measurements, but certainly not necessary as I was going to screw them into the frame either way. The wood came in long pieces of probably 0.5″ x 6″ x 10′ and were in pretty bad shape (really dirty and dinged up), so I sought out to make them new again.
Gave each piece a good sanding with 120 grit sand paper, which removed nearly all the dirt and gave them a smooth consistent feel. After wiping them down good to remove the dust, applied a few generous coats of teak oil. This stuff was amazing. A friend recommended I check it out for bringing out character in wood without really changing the overall color. It seriously did just that – essentially acting like a sharpening filter, it brought out so much detail in the wood – all of the lines, grain, and knots really pop after using it. Let all the boards dry for a few days before screwing them into the frame shown below.


Side profile.
The top was the trickiest part. The original design by Drew used particle board covered in cement, but I’m not familiar with cement so I decided to stick with wood. I bought a few new 2×10 boards and cut them down to the length of the top of the chest freezer, plus about 8 inches on either side – came out to be 3 boards about 50″ in length. To glue them together along the long edges, i used this nifty technique by creating my own bar clamps out of some 2×4’s. This worked fairly well and was incredible cost effective considering real bar clamps are over $1oo each, but it took some finagling to get each of the clamp ends snug up against the wood to keep the planks tight together without any gaps. I glued all three together at the same time with two long clamps, but it might have been easier to just glue the first two together, then glue the third to that glued piece.

Unfinished top
After the top boards were sealed and solid, I finished it by giving it a good sand (120 followed by 240 grit), rounded off any sharp edges, then applied 1 coat of pre-stain (to ensure an even stain and no blotches of what’s to follow), 2 coats of teak oil, and finally 3 coats of satin polyurethane. It came out beautiful, again with the teak oil really bringing out the natural character of the wood.

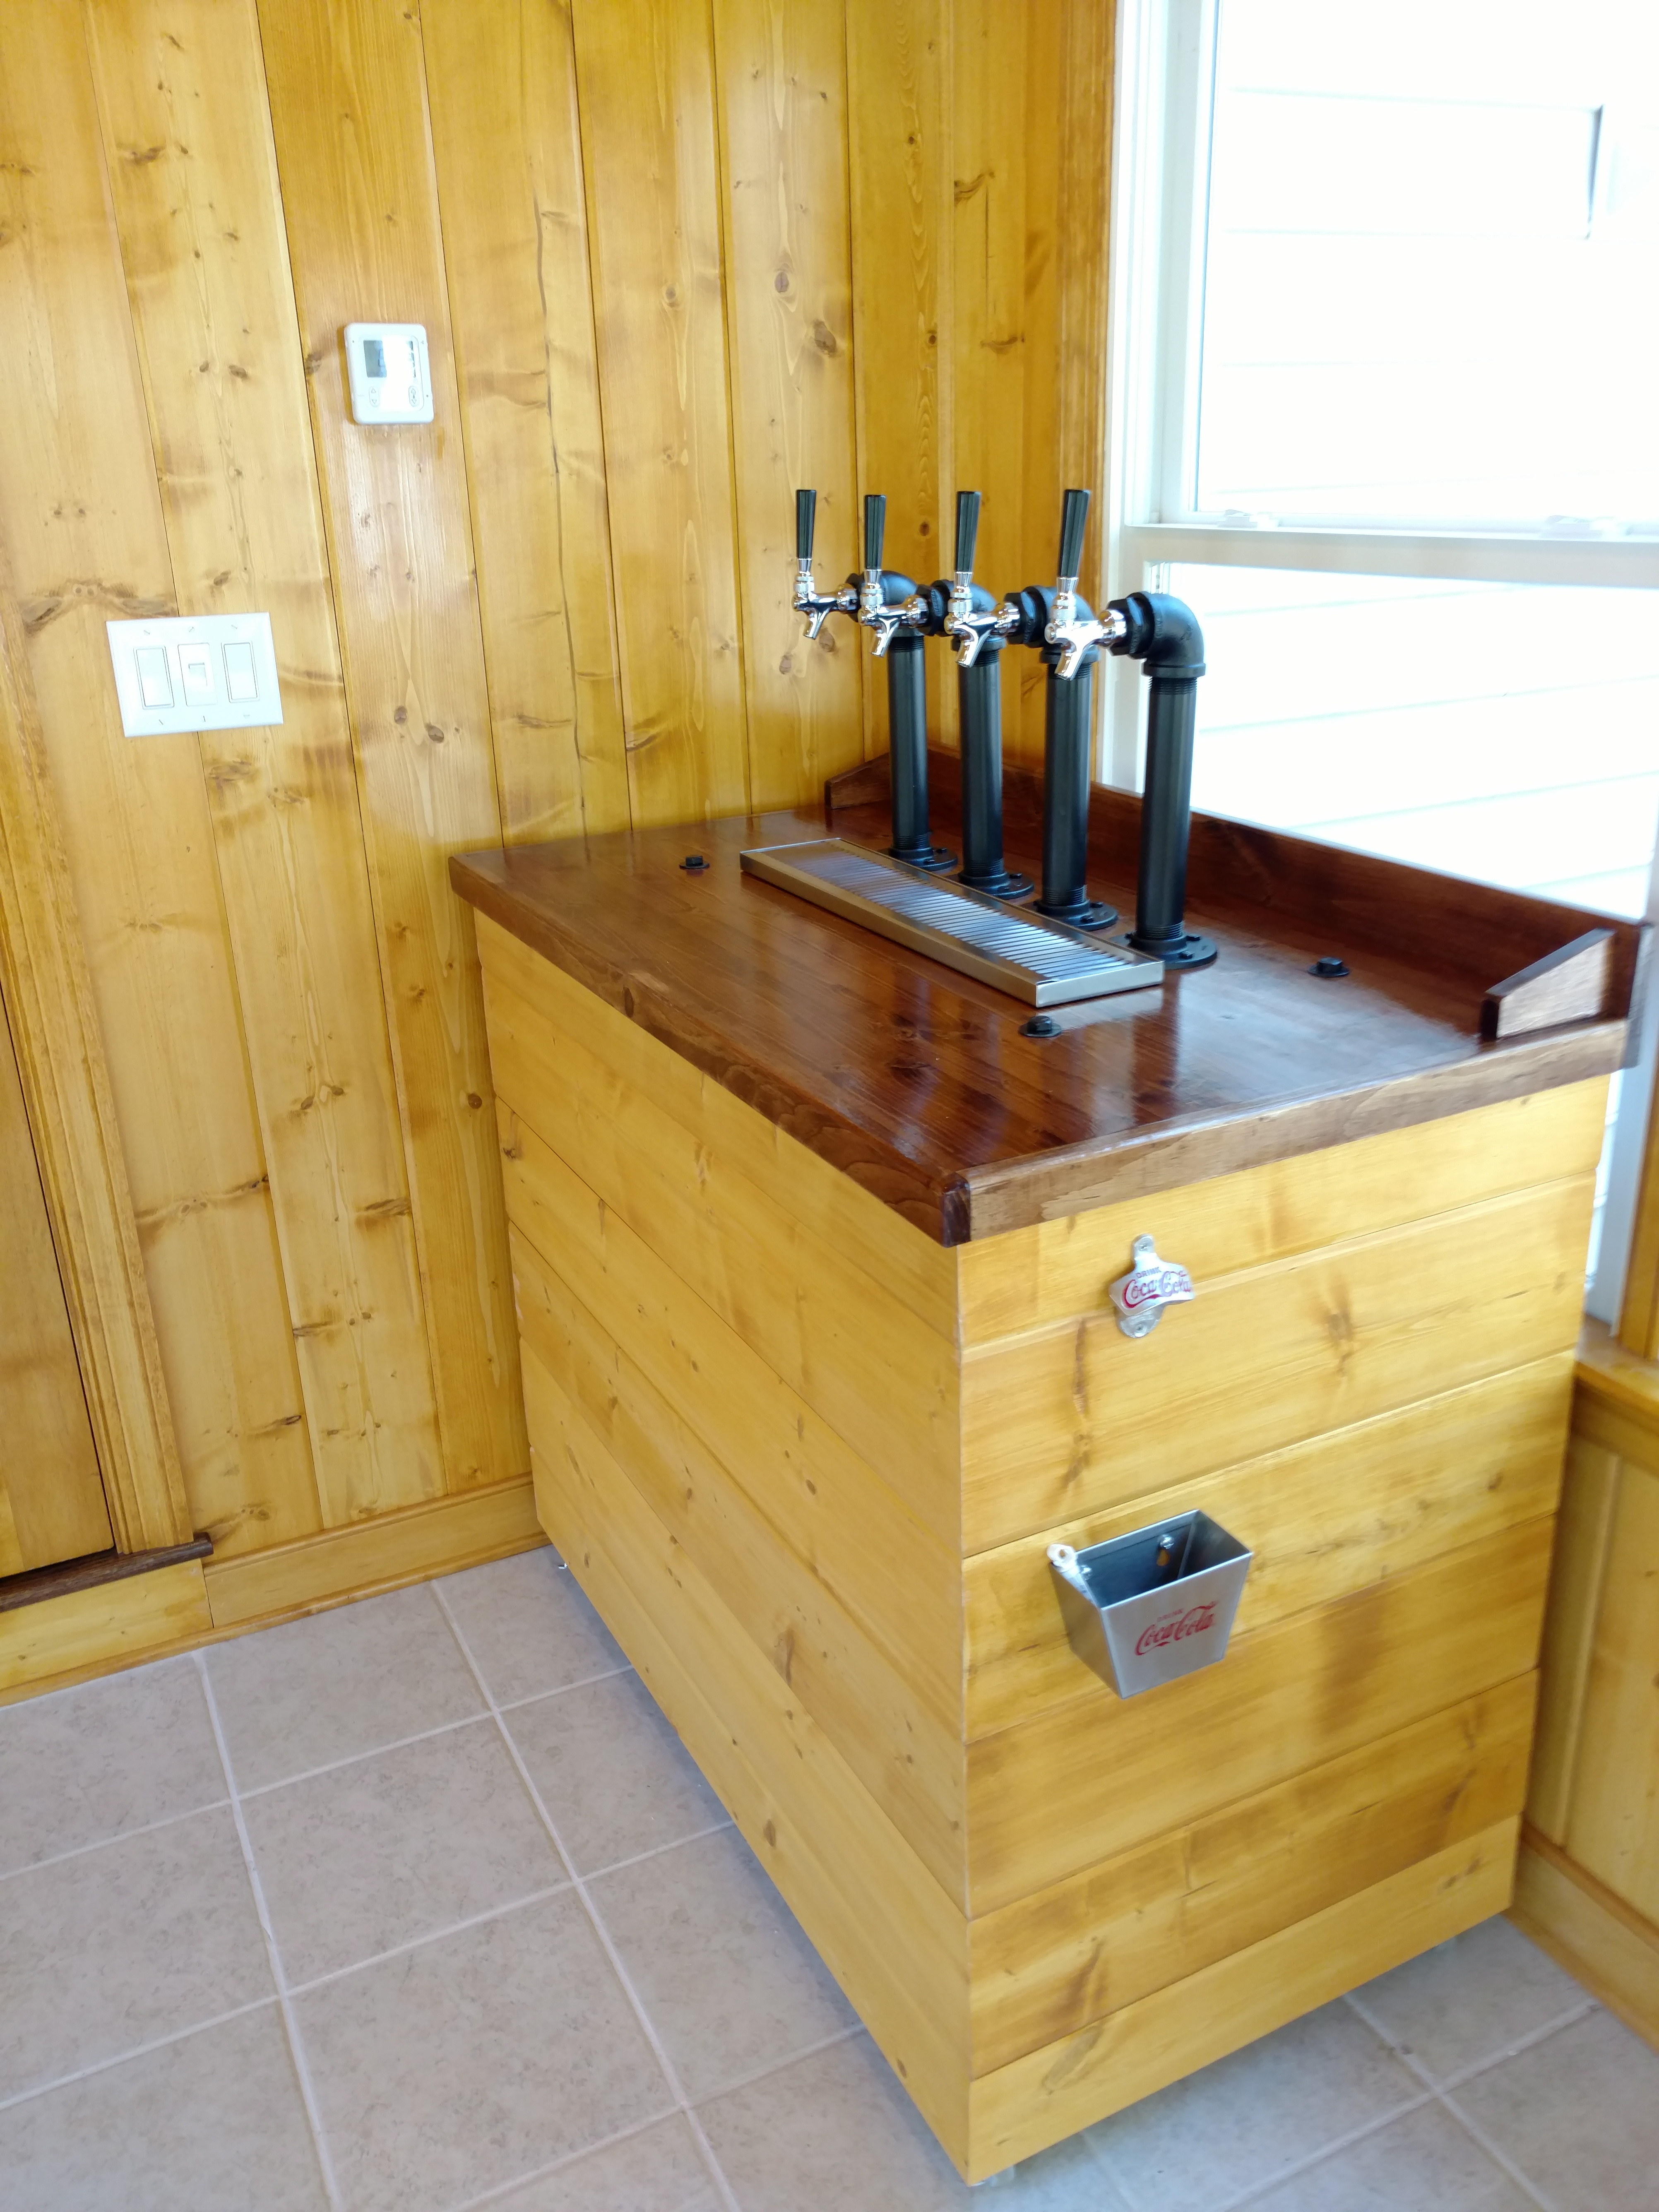
The finished top.
Putting the whole thing together was tricky and i wound up needing a buddy to hold things in place while drilling. The wood top is bolted directly to the chest freezer top and held in place with some carriage bolts. But, before you start drilling anything, my advice is to place the drip-tray (mine is 24″ long) first and measure out everything around that as a reference point. The drip tray is pretty much going to be in the center and is going to dictate where you’re placing the glass while pouring, and hence where the taps will sit behind to dispense beer. My drip tray wound up being pretty close to right in the middle. So I drilled the hole for that, then put the carriage bolts in and locked in the top.

Carriage bolts are those round silver circles to the right of the right-most tap. There are another two to the left of the left-most tap.
Now for the taps. The taps are made from 1-1/4 inch black iron pipe, with reducers similar to Drew’s design. It was tricky trying to figure out how the beer lines would attach to the shank inside the pipe. It’s a tight fit, so the shank can’t be too long, but has to be long enough to screw onto the reducer with the beer nut. This one worked perfectly, just removed the metal spacer at the front of it and it had just enough room inside to attach the beer line with a hose clamp, and screw onto the reducer with the beer nut. Beware of any shanks that have the L-shaped barbed tail piece, typically used for tap towers. Since the reducer has to screw into the elbow joint, the L piece rotates with it and gets caught up against the top of the elbow. I initially bought some of these but returned them.
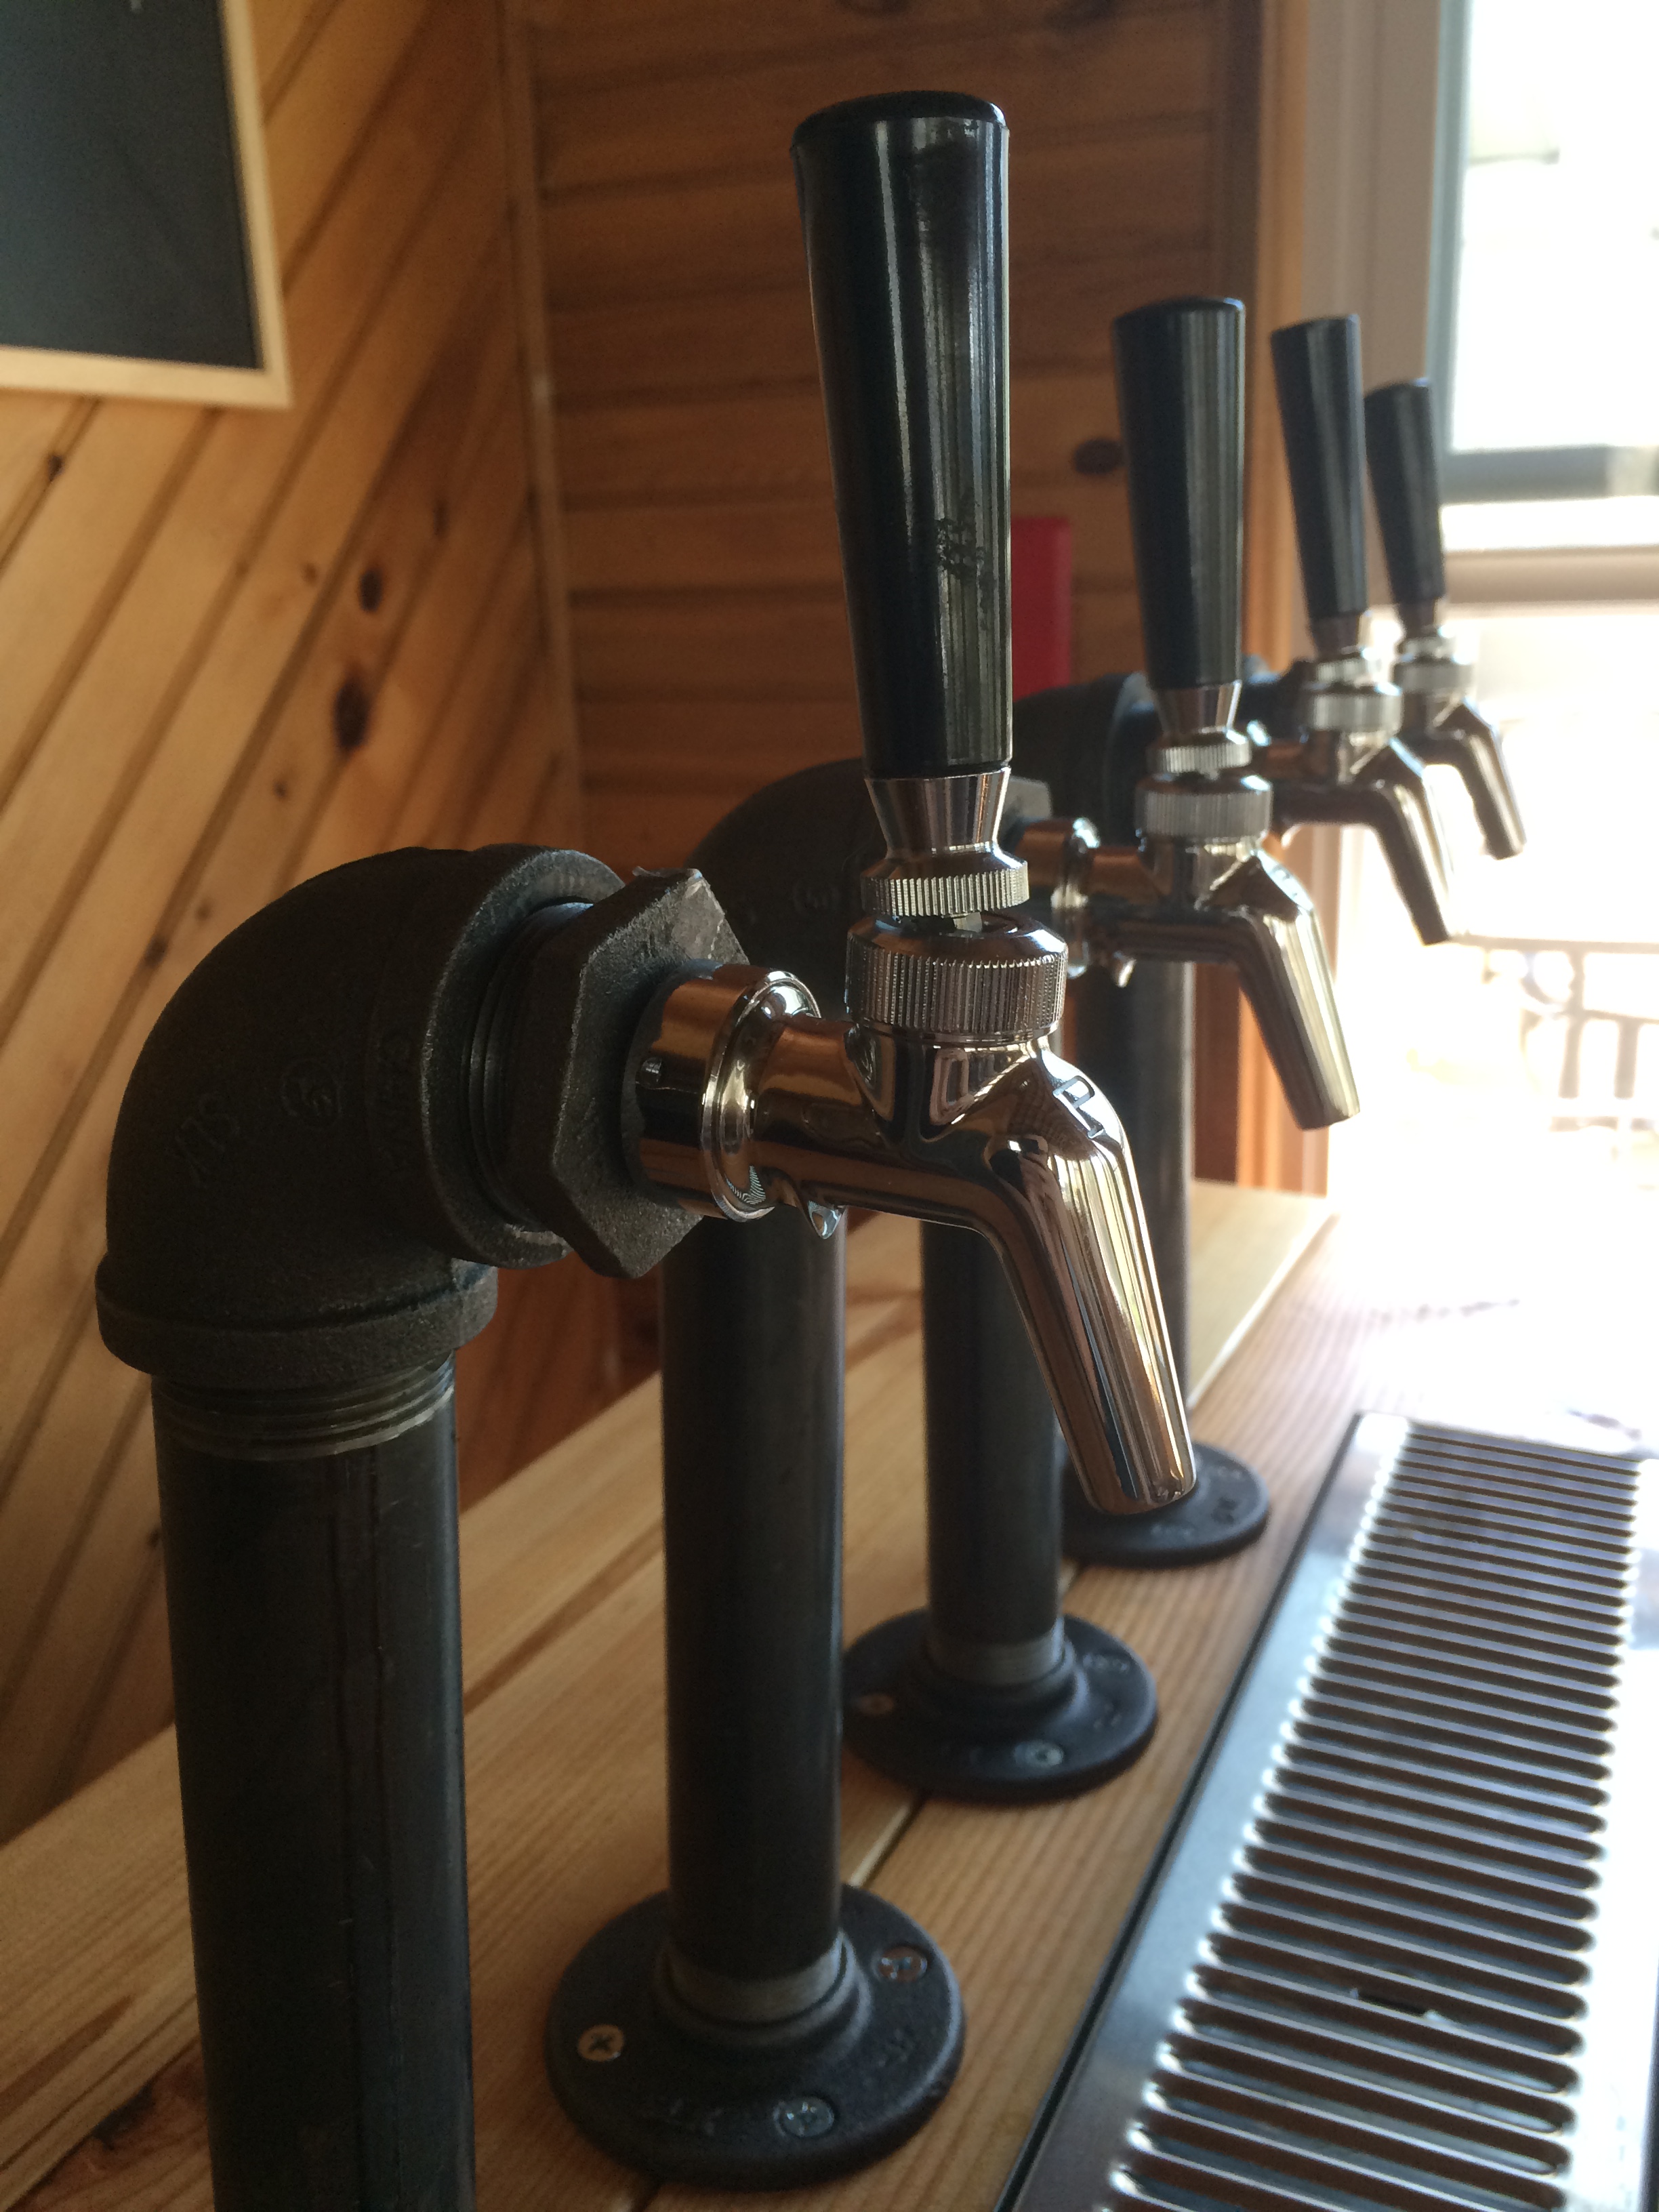
The taps.
Finally, the kegs. Prepare for the the biggest Homer Simpson “DOHHH” moment on earth. By this time I’d built the entire kegerator – the top is bolted on, sides are screwed on, taps assembled, lines attached and ready to put the kegs inside and drink some beer. This is when I discovered that only 3 out of the 4 kegs fit inside. DOHHHHHHHH. It is SO. CLOSE. I needed only about 1/8″ extra clearance to fit the fourth one in, but the kegs just weren’t having it. I had measured out the space beforehand, but I guess I under estimated slightly – the rubber bottoms on the kegs do extend out a little further than I had originally measured. Also, the compressor ledge cuts down on the available floor space inside. Well, this is awesome. A 4-tap kegerator that only fits 3 kegs. Brilliant. The only alternative that made sense was to just go buy a 3 gallon keg that could sit up on the compressor ledge since it’s considerably shorter. So, that’s what I did. The 3-gallon keg and tap will have to be reserved for some small batches, which ultimately I’m more than OK with. All is well, and the fourth tap is back in action.

Three 5-gallon kegs to the left, and the 3-gallon all the way on the right. It’s a tight fit!
This was a pretty intense project that took me close to two months to finish, but I’m really happy with how it turned out. Having to return parts here and there when stuff didn’t quite fit was a pain but hopefully there’s enough detail in here for someone else to recreate it with less trouble. Prost!!!


What length black iron pipe did you use?
The pipes are 10″ long and 1.25″ wide.
Where did you get the drip tray from?
I got the drip tray from this store on Amazon:
http://www.amazon.com/ACU-Precision-Sheet-Metal/b/ref=bl_dp_s_web_9269201011?ie=UTF8&node=9269201011&field-lbr_brands_browse-bin=ACU+Precision+Sheet+Metal
The size I got was 24″ x 5″ (says currently unavailable, but I’m sure you can find it somewhere).
Did you drill holes in the lid of the freezer? How did you avoid the cooling lines?
My freezer didn’t have coolant lines in the lid, so I drilled right through. Maybe try searching for a schematic diagram or manual for your freezer, or, this thread has some other tips that might be useful: http://www.homebrewtalk.com/showthread.php?t=248137
Alex, I’m anxious to try this. Where were you able to find the reducers to mount your faucets into the 1 1/4″ black iron elbows? I can’t find any in the proper size
Home Depot. Here are the ones I used: http://m.homedepot.com/p/1-1-4-in-x-3-4-in-Black-Malleable-Iron-Hex-Bushing-521-964HN/100167047
Here it is finished
Mark, that looks amazing! I love the darker wood top and the sides match your wall paneling perfectly. Nice touch with the raised edge in the back, too. Excellent work!
Alex, looks awesome. are there any issues with ventilation on the side? It looks like you put boards over the vent.
There’s about an inch gap on either side of the fridge, plus some space between the 2x4s. Seems to be enough room for air flow, but I haven’t really checked the external temperature.
Can you tell me where you found the pieces for the pipe assembly? All at home depot?
Yep, all Home Depot. You might be able to find some elsewhere online (eBay, etc.) for cheaper, but I thought it was helpful to be able to go to the store and actually screw things together to make sure they fit.
Thanks Alex. Just picked up some reclaimed wood floor boards from an old tobacco shed which will should look great. Will provide a photo of finished product, which won’t be for a while….
Here is my go at it:
That looks amazing! Excellent work – looks better than mine! 🙂 What kind of wood did you use for the sides?
Heart pine, reclaimed wood floor boards – basically the original patina after sanding down lightly, then just a bunch of coats with satin wipe on poly.
May be a silly question, but I’m guessing by the freezer sitting higher up over the frame, you just open the whole top panel lid like you would the freezer? I’m confused how it opens up. Very nice job by the way. Hope when I tackle mine, it looks half that good.
Not a silly question at all! That’s correct – I made the frame about 1″ shorter than the height of the freezer so that the whole freezer top still opens up like it usually would, with the whole wooden top bolted to the freezer top. Thanks and good luck on yours; post a pic of it here when you’ve finished, would love to see it.
Well…..I’m inspired. Starting mine soon!
Do you find that there isn’t enough cooling going up the towers and getting too much foam? I LOVE the design!
Thanks, Andrew. I haven’t had any foam issues. I have the kegerator out on my non-insulated porch, so in the summer it can get to 95F+. On those occasions I’ll get a little more foam than normal on the very first pour, but it’s fine after that. Since the towers are only about 1 foot tall, there isn’t much beer in the warm section of the line. My hose length is about 6 foot (to get the proper flow rate) for what it’s worth.
Did you just screw the CO2 Distributor into the inside of the freezer
Yes sir!
What was the size of the reducers?
They are 1-1/4″ to 3/4″. https://www.homedepot.com/p/1-1-4-in-x-3-4-in-Black-Malleable-Iron-Hex-Bushing-521-964HN/100167047
How did you convert the freezer to frig? Jeff glass Marquette mi
I have a temperature controller outside the fridge (something like this https://www.northernbrewer.com/johnson-a421-digital-temperature-controller), which sits in between the freezer power and wall socket. The temperature probe gets closed on the lid going into the freezer but the rubber lining the lid has a little give to it so it works.
What size/type of shank did you use? I got an elbow shank with the nipple that curls down on the elbow and its still pretty tight . Thinking it’s going to be a nightmare to pull out each time to clean, and not sure there is enough room behind the shank inside the reduce to keep it tight. My shank I got just barely gets past the elbow, might be pinking the line when I get it attached.
I used a 1-3/4″ shank, here’s the Amazon link below. I found that I wasn’t able to fit the elbow style shank in the 90 degree angle pipe, so I went with a very short straight one and just let the tube curl downward. It was a little tight but it worked without crimping the tube. You’re right, taking it apart to clean is rough; basically requires taking the entire thing apart. Not sure if there’s any other way though. Good luck!
Did you put the shaft through the top of the freezer lid? Or just run the lines though the lid?
Just drilled through the lid and ran the lines through.
What make and model of freezer did you use. Hard to find them tall enough to not have to put a collar in.
7.2 cubic ft Igloo. Not sure what model.
Okay, would you know the height for that one?
Alex,
Loved the design, just finished the top, and the frame, and putting on the towers now. Got all the parts, and they fit fine, having a tough time getting the shank to tighten down with the beer nut on the inside of the elbow on the back side of the reducer. Faucet real lose, still works but if someone pulls wrong it will spin… Basically only could reach up and loosely spin it by hand but never gets tight. What type of tool did you use to tighten the nut, or alternatively lock it in place while you spun the faucet tight?
Thanks
Ah yes, I do remember this part being tricky. I think you’re on the right track – pretighten the shank to the reducer with the beer nut and also attach the faucet to shank with a faucet wrench before attaching the whole thing to the pipe. Before you do that though, take the reducer by itself and screw it into the tower pipe as far as you want it to go in. mark the reducer at the top so rotationally you want it to line up vertically so that once you spin it into the tower, it sits right side up. Even if it’s not 100% screwed in as far as it will go, it’ll be somewhat tighter. Then assemble the shank/faucet, spin it in and it should line up to your mark
Alex,
I am having a trouble figuring out how to connect the faucets. I have 1 Inch Nipples and the 3/4 Reducers are too big and the 1/2 Reducers are too small. How do I attach the faucets to the reducer? I was reading the above comment, you were saying you slide the beer nut inside the reducer from the back-side and then thread the shank onto the nut? Does the shank you used ever physically thread to the reducer? Can you send me a video?
danjlasota.djl@gmail.com
Did you drill through the freezer top?
Yes for the tap lines and bolts to connect the top to the freezer
Any issues with tap lines staying chilled?
Nope!
Hey there! I found your design and this page on Pinterest. I am in the process of gathering the materials to do something similar!
Question regarding your drip tray.. what do you have it draining into in your keezer? Is it just into a gallon jug or something in there?
Thanks!
Yep! The drip tray has a threaded shank that goes through the top of the keezer.